OUTPOST PACKET MESSAGE CLIENT SETUP Version 1.0
What is Outpost and why use it?
(From Outpostpm.org) ... Outpost is a Windows-based packet message client that lets you send and receive packet messages with almost any Amateur Radio Bulletin Board System (BBS), TNC Personal Mail Box or Winlink PMBO.
Outpost was designed for the ARES/RACES packet user community. The thinking behind it was to create an intuitive, easy-to-use program that lets ARES/RACES organizations focus on the "message," not the "medium," as they pass packet traffic to and from an Operational Area BBS. So, what are the overall design goals?
· Hide the native packet environment complexity and shorten the learning curve
· Provide an MS Windows-based packet messaging client
· Automate the packet message handling environment
·
Create a program that behaves
like your email client that you have at work or home…
…create, send, receive, read, delete, reply to, or forward messages
· Support the response efforts and requirements of our local municipalities and served agencies
Outpost has a similar look and feel to other contemporary mail clients. It features Windows-driven forms and screens that handle creating, sending, receiving, storing, and printing packet messages from your PC. It also can run automatically where it periodically checks for out-going and in-coming messages.
Outpost does not support any packet message forwarding protocol. Instead, it interprets the information sent from the TNC and BBS, then generates the TNC and BBS commands needed to send, list, and retrieve messages from the BBS. It essentially automates the keyboard entry and interpretation performed by the user...
PREPERATION FOR INSTALLATION
Installing Outpost is easy. It is highly recommended that you install Outpost in its default directory "C:\Program Files\Outpost\". Before you begin you will need to download the following four files from Outpostpm.org.
op220c194.zip - This is the latest program package which contains the setup.exe program, released 4-6-07 Version 2.2c194.
op220u211.zip - This file contains is an update only executable file which adds Winlink capabilities, released 7-4-07 Version 2.2c211.
op220ConfigFiles.zip - Outpost configuration sample files. These sample files will save you a lot of time in first configuring Outpost.
OutpostUG220.pdf - Outpost Version 2.2 User Guide
INSTALLATION
1. Download the op220c194.zip file extract the contents to a temporary folder. Execute the setup.exe program and accept all the default prompts.
2. Download op220u211.zip.
a. Go to where Outpost was installed - c:\program files\Outpost.
b. Open the op220u211.zip file. You will find the following two files
Outpost.exe
README220u211.txt
c. Copy the two files to the Outpost directory.
d. Run Outpost. Press Help > About Outpost. Confirm the version says v2.2.0 c211 as in Figure 1 below.
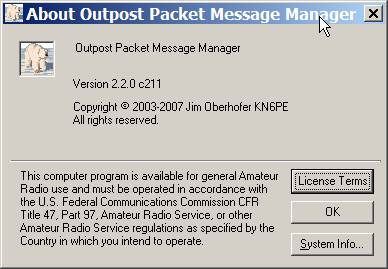
Figure 1
e. Close Outlook.
3. Download op220ConfigFiles.zip.
a. Go to where Outpost was installed - c:\program files\Outpost.
b. Open the op220ConfigFiles.zip file. You will find the following three files
TncInfo.dat - contains sample device configurations
BbsInfo.dat - sample BBS configurations
aa6wk-2.pth - example of a KA-Node path file referenced by a BBS
c. Copy the three files to the Outpost directory.
INITIAL SETUP
Initial setup involves three basic steps;
1. Identify your Station to Outpost
2. Setup a TELNET TNC for Winlink
3. Setup a HARDWARE TNC for TELPAC
4. Setup a local BBS to communicate with when using an hardware TNC such as a Kantronics KPC3 or KPC3+. Note, a BBS is required even if you only intend to use Outpost as a Winlink Client, it will not be used but Outpost will not allow any send/receive sessions without one defined BBS.
1. Identify you station to Outpost - Start Outpost, you will see the following screen
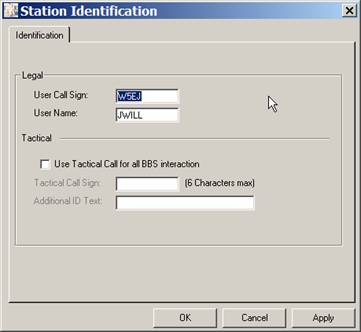
Figure 2
Enter your station call sign and a user name of your choice in the User Call Sign and User Name fields as shown in Figure 2. Select OK when finished.
2. Create a TELNET TNC for Winlink: In order to send Winlink e-mail you must a Winlink PMBO with internet capabilities. There are several that can be found on winlink.org . For our setup we will use the N0IA PMBO (A Winlink 2000 participating network mailbox (MBO). PMBOs or Radio Message Servers , communicate with each other through the common message servers or CMS's in a "star" network configuration via the Internet, and with the end-users over radio or internet via Telnet or WEB browser access, click here for more information on Winlink features )
From the main Outpost window choose Setup->TNC (Figure 3)
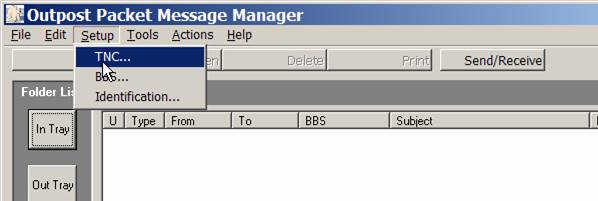
Figure 3
In the Interface Type Tab click on NEW and select TELNET as the device type. Next enter a device name in the Device Name field; this can be any name you choose to identify the TNC (figure 4).
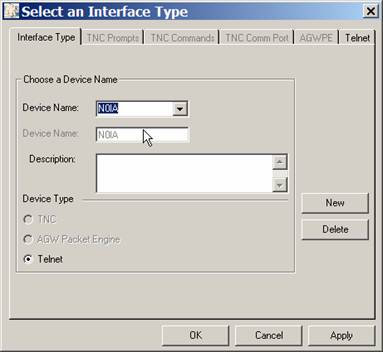
Figure 4
Next, in the Telnet Tab, fill in the fields as shown substituting your callsign in the Login Values->Login field. Be careful to type in the period “.” in front of your callsign. When finished click OK (figure 5).
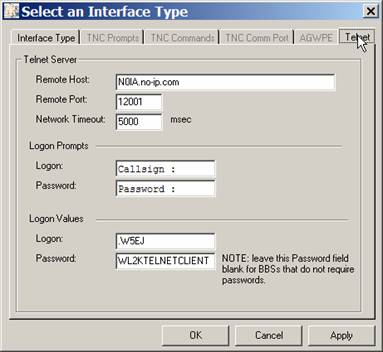
Figure 5
3. Setup the hardware TNC – A TNC or radio modem/terminal node controller is a hardware device that is used to interface your radio with a computer. A TNC allows for sending and receiving data with another station using various applications. A typical setup might look like figure 6;
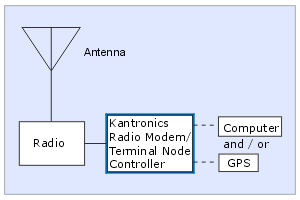
Figure 6
From the main Outpost window choose Setup->TNC (Figure 7)
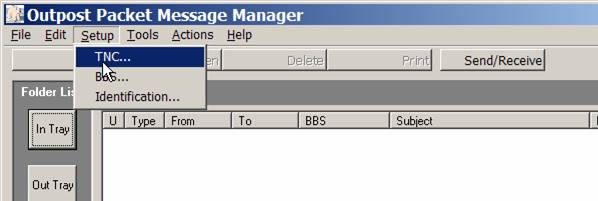
Figure 7
In the Interface Type Tab click on NEW and select TNC as the device type. Next use the Device Name drop box and choose your TNC, in this case we will use a Kantronic’s KPC-3 device which is already defined within Outpost (figure 8). Next, choose the TNC Comm Port tab (Figure 9) and make sure the communications port settings match your TNC=>computer setup. For a list of TNC's that work with Outpost click here. When finished click OK to return to the main screen.
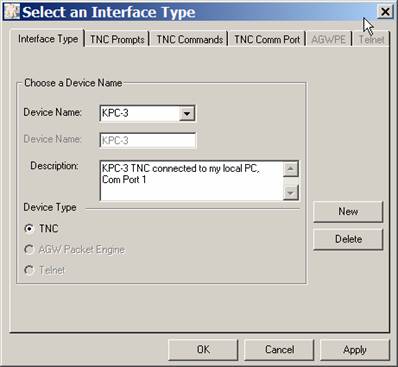
Figure 8
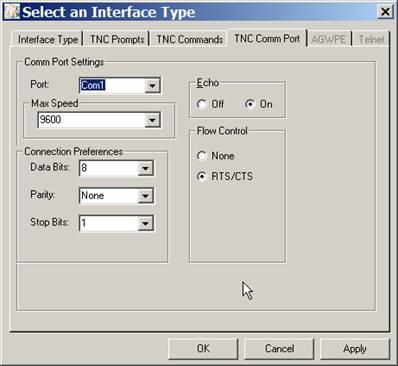
Figure 9
3. Setup a BBS – A BBS is a Telpac station running BBS software such as FBBS or a local PBBS (Personal BBS) that is built into many TNCs. In the Dallas area there are several stations which run FBBS software. For our setup we will use the Rockwall Telpac station W5ROK-1 on 145.010 Mhz. For additional local Telpac stations see the list at the end of this document.
From the main Outpost window choose Setup->BBS 9 (Figure 10)
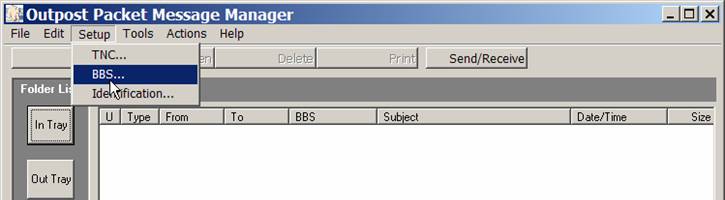
Figure 10
Next, in the BBS Name Tab fill in the fields as shown in Figure 11, when finished click OK to return to the main screen.
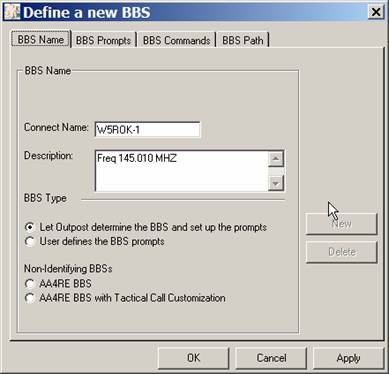
Figure 11
This completed setup of Outlook. You should now be ready to send and receive messages and bulletins using Outpost.
ADDITIONAL LINKS AN RECOMMENDED READING
- Outpost Users Guide - Recommended reading before you use Outpost
- Winlink for ARES - Part I Part II By Jerry Reimer, KK5CA ARRL South Texas Section Emergency Coordinator. The concept of using Winlink2000 on a national basis is considered by the ARRL Board of Directors and the ARRL Ad-Hoc Committee on ARES Communications.
- Introduction to
Winlink 2000 (67,237 bytes, PDF file) QST June, 2002, p.31
One integrated digital system links the VHF/UHF packet networks,ham-to-ham radio messages and Internet e-mail—worldwide. - WinLink 2000--Internet E-mail from Anywhere!
- WinLink 2000: A Worldwide HF BBS (98,548 bytes, PDF file) QST, March, 2000, p.90
- http://www.winlink.org/Presentations/dcc2003.pdf - Winlink and Telpac presentation by Victor Poor, W5SMM and Rick Meuthing, KN6KB
SUPPORT LINKS
HELPFULL HINTS
- To stop outpost from displaying the Station Identification screen each time you start Outpost, from the main Outpost window choose
Tools->General Setting...-> and uncheck the "Show Station ID Form on Startup checkbox then click OK to return to the main screen. - Outlook can have only one TNC active at this time, so remember to swtich between your Winlink and Telpac TNC sending and recieving the appropiate type traffic.
- Internet message addressing. Outpost allows a user to address a packet message to an individual using their internet email address. Outpost supports the "SMTP:" prefix that is required to identify a packet message destination as an internet address (example: SMTP:w5ej@arrl.net).
| Dallas Area Telpac Stations | |||
|---|---|---|---|
| STATION ID | FREQUENCY | LOCATION | SPONSOR |
| W5ROK-10 | 145.010 | GARLAND | Rockwall Collins ARC |
| K5BAD-10 | 145.030 | FRISCO | Collin ARES SW |
| W5RAE-10 | 145.030 | NORTH CENTRAL PLANO | Collin ARES SW |
| WA5KXX-10 | 145.030 | CENTRAL PLANO | Collin ARES SW |
| W5ADC-10 | 441.050 | CENTRAL PLANO | Collin ARES NE |
| NORQ-10 | 145.050 | MCKINNEY | Collin ARES NE |
| K5EEN-10 | 145.090 | NEVADA | Collin ARES SE |
| WB5KSD-10 | 145.090 | E FARMERSVILLE | Collin ARES SE |
| W5RMH-10 | 145.090 | CENTRAL PLANO | Collin ARES SE |
| N5BYL-10 | 145.090 | PARKER | Collin ARES SE |
| KI5FU-10 | 145.090 | ALLEN | Collin ARES SE |
| W5TUX-10 | 145.090 | MCKINNEY | Collin ARES SE |
Corrections Additions and Comments, please contact John Will @ W5EJ@arrl.net.